🎬 The Python Data Science Workflow, Part 2: Visualize, Export & Name the Workflow
In Part 1 we turned a raw file into a twelve-number monthly climate summary, taking steps 1, 2, 7 and 8 of the ten. This afternoon we finish the job. You will turn those twelve numbers into a picture, save your summary to a file that a collaborator could open, and then we will give the ten-step workflow we have been running all afternoon its actual name.
Same idea as Part 1 🚀
Part 2 is still a preview, so keep working the same way: copy a cell, run it, then change one thing. We will learn how visualization actually works on Day 7, and there is rather more to it than the two lines you are about to copy. Today, just enjoy turning numbers into a picture!
Getting Started
Set up your notebook with the usual ritual:
Create the file. In the Explorer, hover over the EDS217 heading and click New File…, then type the name in full, extension included: Session_1D_Workflow_2.ipynb
Check the kernel. The Kernel Selector in the notebook’s action bar should read Python 3.11.15 (Conda: eds217). If it reads anything else, click it, choose Change Kernel, and pick the eds217 entry.
Add a title cell. Click + Markdown in the action bar, and give it this content, with today’s date:
# Day 1: Session 1D - The Python Data Science Workflow, Part 2[Session Webpage](https://eds-217-essential-python.github.io/course-materials/interactive-sessions/1d_data_science_workflow_2.html)Date: 08/31/2026
Save with Ctrl + S (Cmd + S on macOS), and keep saving as you go.
Pick up where Part 1 left off
We are in a new notebook, which means a new kernel, so df and monthly_means from Part 1 are not in memory any more. Run the cell below to rebuild them before we go on. It also sets url again, which the sandbox at the end of the session needs.
✅ Canonical cell. Copy and run it exactly:
Code
import pandas as pdimport matplotlib.pyplot as plturl ="https://eds-217-essential-python.github.io/data/toolik_weather.csv"df = pd.read_csv(url)monthly = df.groupby('Month')monthly_means = monthly['Daily_AirTemp_Mean_C'].mean()
Step 10: Visualize 🖼️
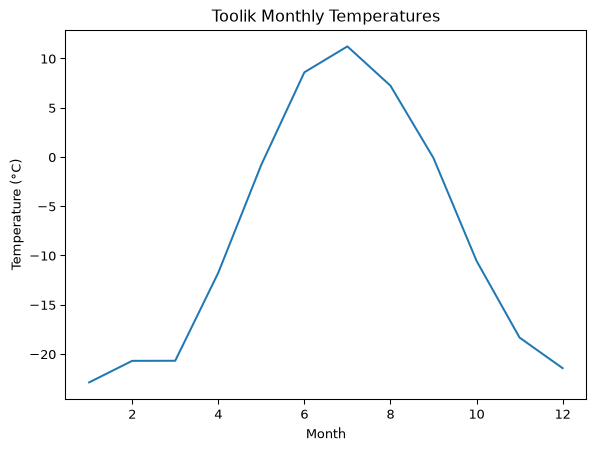
Visualize means turning numbers into a picture you can read quickly. The simplest plot is a line plot with plt.plot().
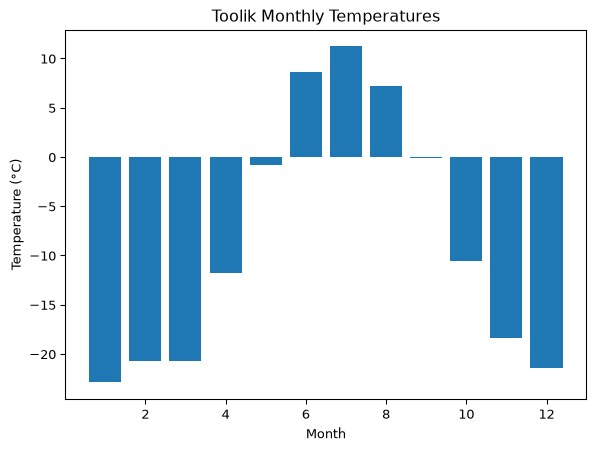
The same twelve numbers now show a clear seasonal cycle. We can also draw them as bars with plt.bar(), which takes two arguments rather than one: the month numbers for the x-axis, and the averages for the height of each bar. Both of those arguments come out of your monthly_means, the months from its index labels and the averages from its values. Copy the plt.bar() line below exactly.
Change only a label. The data stays exactly the same. Pick one new title from this menu and re-run:
plt.title("Average Temperature by Month")
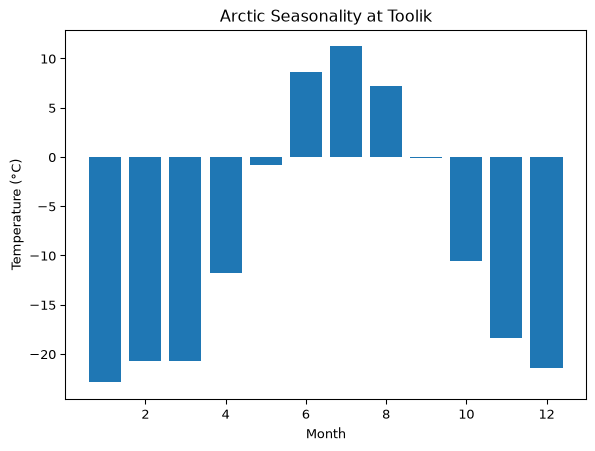
plt.title("Arctic Seasonality at Toolik")
plt.title("Monthly Mean Air Temperature, 1988 to 2018")
You could reword the plt.ylabel(...) text instead. Either way, change just one thing.
Code
# 🔁 Example: same plot, one new label. The data (monthly_means) stays the same.plt.bar(monthly_means.index, monthly_means)plt.title("Arctic Seasonality at Toolik")plt.xlabel("Month")plt.ylabel("Temperature (°C)")plt.show()
✍️ Say it in a sentence (required)
Read the coldest month’s value off your chart, then report it in an f-string. You will not get an exact number off the y-axis, and close enough is fine here. For example:
coldest =-22.9# January's value, read from the chartprint(f"Toolik's coldest month averages about {coldest} degrees Celsius.")
Now write one more sentence comparing it to the warmest month.
Export 💾, part of step 10
Export means saving your results so that you, or a collaborator, can use them later without re-running everything that produced them. A summary that only exists inside a running notebook is gone the moment the kernel restarts. monthly_means.to_csv(...) writes your summary out to a file on disk.
✅ Canonical cell. Copy and run it exactly (in your notebook):
float_format="%.2f" rounds every number to two decimals on its way into the file. Without it a mean is written with all fifteen of its decimal places, which is more precision than the thermometer ever had.
Open the Explorer in Positron and you should find monthly_means.csv sitting next to your notebook. Its first few lines look like this:
Same data, new file. Your monthly_means in memory stays the same.
✍️ Say it in a sentence (optional)
Name what you saved. For example, set filename = "monthly_means.csv" and then print f"I saved my results to {filename}."
Naming what you just did: the 10-step workflow
You have now run a workflow, from a file on the internet all the way to a chart and a saved summary. Here is that workflow, named in full. Almost every analysis in this course, and most of the analyses you will do after it, is some path through these ten steps:
flowchart LR
    A["1. Import 📂"] --> B["2. Explore 🔎"] --> C["3. Clean 🧼"]
    C --> D["4. Filter 🎯"] --> E["5. Sort 🥇"] --> F["6. Transform ➕"]
    F --> G["7. Group 🗂️"] --> H["8. Aggregate 📊"] --> I["9. Join / Reshape 🔗"]
    I --> J["10. Visualize 🖼️"]
Today we took the path Import → Explore → Group → Aggregate → Visualize, which is steps 1, 2, 7, 8 and 10. We skipped Clean because this column needed none, and skipped the rest because this analysis does not need them. Saving the file counts as part of Visualize, which is why the map has ten steps rather than eleven. Skipping steps is normal, because few analyses need all ten of them. The steps an analysis does use always run in the numbered order.
📖 Read more:The Data Science Workflow gives a one-sentence description of each step and shows which day you will learn it.
🗓️ Coming Attractions
Every command you copied today without really reading it becomes a friend on a specific day:
Step
What it does
You’ll learn it on
1. Import
Load data into a DataFrame
Day 2
2. Explore
Get to know the table
Day 2
3. Clean
Fix missing values, types, duplicates
Day 4
4. Filter
Keep only the rows you want
Day 3
5. Sort
Order rows by a column
Day 3
6. Transform
Build new columns
Day 4
7. Group
Split rows into buckets by a key
Day 5
8. Aggregate
Collapse each bucket to a number
Day 5
9. Join / Reshape
Combine tables; add a time dimension
Day 6
10. Visualize
Turn numbers into pictures
Day 7
🧪 Sandbox (5 minutes)
Play! Re-title a plot, swap plt.plot for plt.bar, save under a silly file name, or break something on purpose. Errors are expected and welcome today, and breaking a cell costs you nothing here, because the restart cell below rebuilds everything from the original file.
↩︎️ Canonical restart. Run this to rejoin the group
When time is up, run this to reload the data and rebuild your results from scratch:
Code
# Restart: reload df and rebuild the canonical resultsdf = pd.read_csv(url)monthly = df.groupby('Month')monthly_means = monthly['Daily_AirTemp_Mean_C'].mean()
Key Points
Visualize with plt.plot() and plt.bar(). Label with plt.title(), plt.xlabel(), and plt.ylabel(). Today we change labels only.
Export your results with .to_csv("filename.csv"), so that your summary survives a kernel restart and somebody else can open it.
The complete ten-step workflow is Import, Explore, Clean, Filter, Sort, Transform, Group, Aggregate, Join/Reshape, and Visualize.
You now know the plan for the whole course. Each of the next six days teaches one or two steps of this same workflow, and Days 8 and 9 are your own project.
🎉 You have now seen the complete workflow. We ran it end to end this afternoon, from a data file on the course website to a finished chart and a summary saved to disk.